One of my favorite locations to spend time practicing my craft in Austin proper is on the grounds of the Texas State Capitol. In morning or evening light, the “sunset Red” granite that makes up the historic building seems to change color and glow in the half-light of day, and the subtle tones the camera can capture bring to life an impressive and iconic Texas landmark.
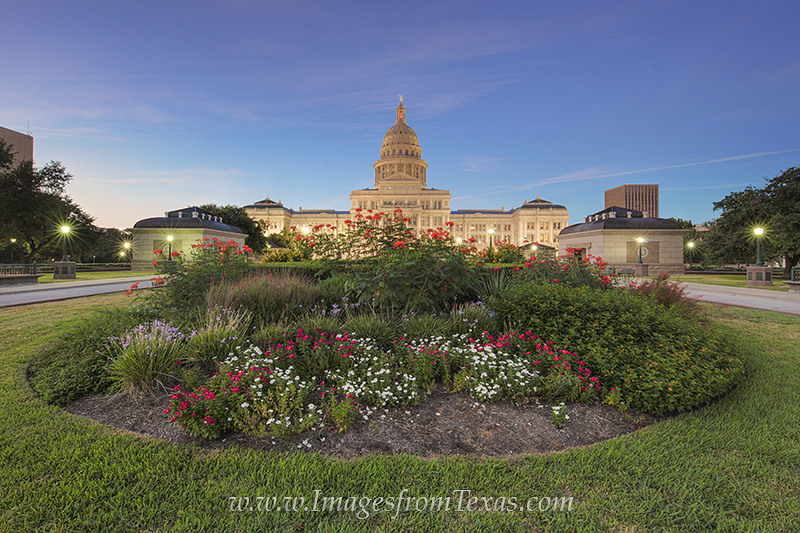
September flowers adorn the north lawn of the Texas State Capitol. Facing north just before sunrise, the sky is calm and the colors are wonderful. In the distance, the historic Texas landmark rises 308 feet into the cool air as the Goddess of Liberty statue on top of the Capitol welcomes in a new day for all Texans.
Elijah Meyers designed the state capitol in Austin. After a nationwide contest, Meyers won in 1881 and received his reward – three million acres in the Texas Panhandle! This land later became the famous XIT Ranch. Meyers also served as the architect for the Colorado and Michigan Capitols.
The Capitol opened to the public on April 21, 1888, after 6 years of construction. The exterior was originally slated to be made of limestone, but limestone streaked, and a debate over the final rock delayed the start for nearly two years. Landowners in Marble Falls ended the arguments by donating the “Sunset Red” granite, and construction was again underway. Along this same timeframe, the state gave the contractor 1,000 convicts to quarry the granite. However, the use of convict labor was fought by the granite cutter’s union, and eventually experienced stonecutters from Scotland were brought in to finish the building.
The capitol sits on 22 acres of beautiful land. From 1991-1994, the outside of the Capitol was restored with repairs to the dome, walls, roof, and granite. The interior was returned to its original look of the early 1900s. The grounds of the Capitol were also updated, restructuring the Great Walk (on the south side leading from Congress to the front steps) and the Oval Walk (a path circling the building. Along this time, nearly 200 trees and native plants were brought in to restore the beauty of the location. Historical monuments also preside in various locations around the complex. Some of the most well-known include statues of the Texas Rangers, the Texas Cowboy, and Heroes of the Alamo.
That’s a brief overview of the Capitol, but to really feel the history, get out and explore. Rose gardens, flower gardens, monuments, trees, and other objects make great foreground elements for photographing the architecture, and the morning and evening light can be captivating. One of the drawbacks, though, is the building faces north/south, so it is hard to capture a brilliant sunrise or sunset – but not impossible. Persistence pays, along with a little luck with the weather.
I like to use a wide angle lens here – and for me that is the Canon 11-24L. But any good wide angle lens can capture the depth of the Capitol grounds. In the early morning and late light when the sky is generally still dark, I’ll often take several exposures to obtain the right light on the building walls. (The Capitol is lit by flood lights so this is necessary to avoid over exposed areas of the building and underexposed portions of trees and bushes.
You can also enjoy a telephoto lens for close-ups of the dome, the statues, or any other creative aspect that perks your interest. The bottom line is to get out and have fun!
If you have any questions, please contact me. I’m happy to help.
I am occasionally asked the process I use to photograph the Milky Way over different Texas landscapes, so I thought I’d take a few minutes in an attempt to explain my thinking process.
First and foremost, I’m a planner. And I also like my sleep. So when I do give up sleep and head out to capture the night sky, I want to leave few things to chance.
If at all possible, I always scout the area I plan on visiting. I like to take a few shots from the location during the day just to see how different compositions look. I don’t want to get home after all-night shooting event and be disappointed at lay of the land on my computer.
Next, a downloadable app called Stellarium really comes in handy. This free program lets you know where and when the Milky Way will appear at any given location and time. It also shows the moon, so you’ll know if the moon could be a hindrance to a dark sky. It has proven invaluable in my nightscapes, and I always reference it before heading out.
As a sidenote, the moon will not necessarily interfere with your night sky shooting, but you need to know what phase and what location it is in. If the moon is more than a quarter showing, I’d wait. If the moon (in any phase) is in the same half of the sky as the Milky Way, I’d again put off shooting until better conditions are available. Personally, I will not shoot the Milky Way if the moon is anywhere in the sky, but I have friends that do.
So with the preliminary work done, I head out. If I’m shooting after sunset (as opposed to early morning), I’ll often arrive at my chosen location just before the sun sets in order to photograph the location during magic hour. About 45 minutes after the sun sets I’ll take some foreground images using the bracketing function (taking several exposures of the same image to use later).
And then transition into night shooting mode. For this, I do a few things:
* switch the camera into bulb mode
* set the ISO initially to 2500 (this will move down to 800 when I’m ready to take the “real” shots”)
* hook up my IOptron Startracker (this entails knowing setting the latitude, aligning the machine with a scope to the North Star, leveling everything with the level-bubbles on both my tripod and Startracker.)
* plug in my remote that allows me to take long exposures
* calibrate my GPS/compass
After everything seems ready, I wait for the stars to appear. When I start seeing stars, I try to manually focus my camera on a star using the “LiveView Mode.” This is the most tedious portion of the evening. Sometimes even finding a star is difficult because you have to have the focus just right, as well as have your camera zoomed onto a bright star. Have patience, and keep plugging away until you finally find a star in your screen. (Make sure autofocus is turned off! I’ve located the star before but forgot to turn off Autofocus. When you press the shutter button, the camera then continues in vain to attempt to find stars. Then you have to repeat the process again.)
Using the compass, I know where the North Star appears, so when I finally do see it, I align the scope. Once finished, I point my camera (on manual focus) towards the Milky Way. With the ISO set to 2500 and the aperture to ~ f/2.8-4 (depending on which lens I use), I take a 20-30 second exposure, check the screen to view my orientation of the Milky Way, and adjust accordingly. At this point in the shoot, I don’t care about the foreground. I try to have a small portion of the horizon showing in my image, but that is strictly for reference. With the Startracker on, I reset the ISO to 800, then start shooting longer exposures. I’ll check the focus again after a longer exposure to make sure there are no star trails or tails, then gradually increase the exposure time up to 3-4 minutes, depending on the ambient light and how much it is lighting up your image.
During these long exposures, I’ll use my phone to time the shot. One very important thing here… while your camera is rolling, please take the time to look up and marvel at the night sky before above you. Sometimes I can get caught up in the technical aspects of this and forget why I’m really out there – to appreciate the beauty of the heavens and share this wonder with others.
One other thing I like to do that helps increase final size is take several images of the Milky Way in a horizontal orientation. I’ll take three images, moving my lens upwards after each shot. Back at home, I’ll stitch these images together producing a large and detailed photograph of the Milky Way.
From here, I’ll go back and blend the Milky Way with the foreground shot taken before dark. I’ll use masks, layers, refine mask, some lightening and darkening as needed, and work on the details until I have my final image. I usually like to leave the foreground pretty bright so the viewer can see the details of the landscape as well as the amazingness of the night sky. This is just a personal preference. Adjust the exposure to your liking.
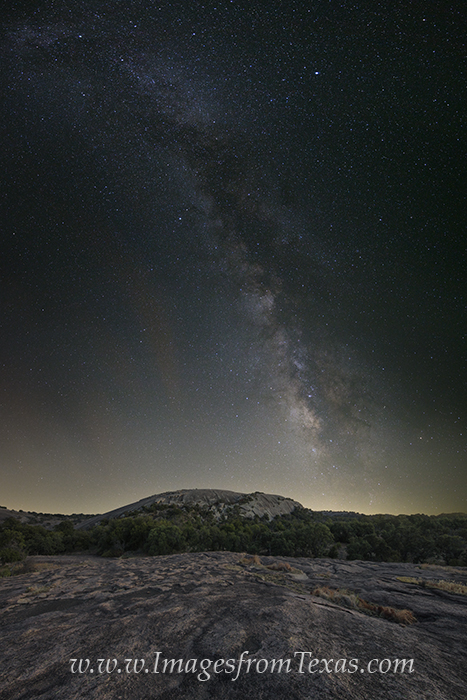
Here is a finished image from Enchanted Rock State Park in the Texas Hill Country. It is comprised of several shots before dark, along with a vertical stitched panorama of the Milky Way.
On a perfect September evening in the Texas Hill Country, the Milky Way rolls across the heavens over the inconic Enchanted Rock. This image was fun to make. It first required a walk to the opposite side of this granite rock in the Llano Uplift. The area from which I was shooting is a little off the trail, so just arriving here required some tip-toes through the cacti. After shooting several locations to use for the foreground – different angles of the Rock – I settled in and waited for the stars to appear. With soft clouds lingering on the horizon, the Milky Way did not disappoint. The distant clouds almost seemed like an soft orange version of the Arora Borealis. The exposure for the Milky Way was over 3 minutes, and it seemed you could reach out and touch each star. This image from the Hill Country was taken with a wide angle lense to show the grandness of the night sky across the Texas landscape. On a perfect September evening in the Texas Hill Country, the Milky Way rolls across the heavens over the inconic Enchanted Rock. This image was fun to make. It first required a walk to the opposite side of this granite rock in the Llano Uplift. The area from which I was shooting is a little off the trail, so just arriving here required some tip-toes through the cacti. After shooting several locations to use for the foreground – different angles of the Rock – I settled in and waited for the stars to appear. With soft clouds lingering on the horizon, the Milky Way did not disappoint. The distant clouds almost seemed like an soft orange version of the Arora Borealis. The exposure for the Milky Way was over 3 minutes, and it seemed you could reach out and touch each star. This image from the Hill Country was taken with a wide angle lense to show the grandness of the night sky across the Texas landscape.
And that’s it. There are details aplenty, but you’ll figure those out soon enough – it just takes time, trial, and error. And how you handle many of those finer points is dictated by your likes and preferences.
I was recently asked about some locations I most enjoy visiting in and around Austin. After mulling it over, one of my favorite places to shoot both in the morning and evening is the Pennybacker Bridge, known to the locals as the 360 Bridge. Opened to the public in 1982, the steel for the arched suspension bridge was forged in Japan, shipped to a port in Houston, then brought by truck to its final destination. The bridge is 1,150 feet long, and no portion of the structure touches the Colorado River that flows below.
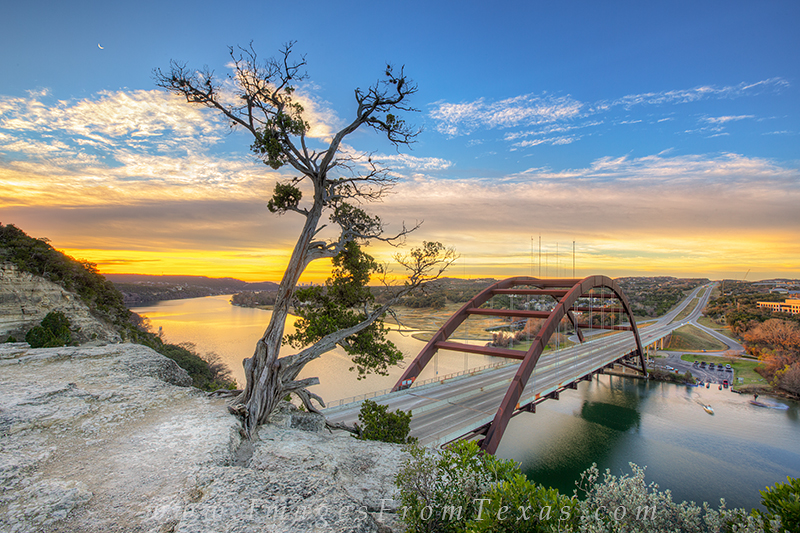
Speaking from a photographer’s perspective, you can find unique perspectives from all four corners of the bridge. The most photographed angle comes from the cliff on the northeast side. This view looks directly at the bridge with the distant Austin, Texas, skyline on the horizon. I like sunrises from this location because you can often enjoy colorful skies, as well.
This well known tree sits on the cliff overlooking the 360 Bridge (formally known as Pennybacker Bridge). It was cold on this morning in mid-January. The crescent moon rose in the east just ahead of the sun and the sky was a beautiful orange and blue. Nestled in the branches of the tree is the distant skyline of Austin, Texas.
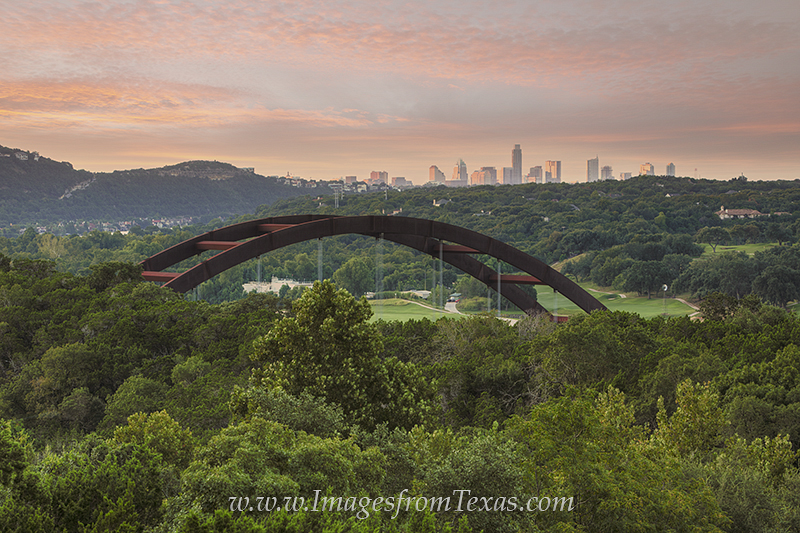
From the southeast corner, you have a view of the bridge and the Texas Hill Country that stretches upriver to the western ridge. Sunsets from this location can be stunning, and you’ll rarely see folks up on this side (which is a plus for me). From the northwest and southwest sides, you’ll find yourself below the bridge and down by the water. There is boat ramp in this location but if you are patient, you’ll have some still water. You can enjoy nice views looking up at the bridge and cliffs from this angle, and morning or evening clouds can be spectacular on any given evening. From the north west side, I like shooting back towards the bridge just after sunrise to include a starburst in the image.
From just outside Austin, Texas, this is the iconic 360 Bridge at sunrise on a perfect September morning. Near this location is a boat launch, and the ramp was plenty busy this morning with folks enjoying the perfect central Texas weather.
Other nearby locations also provide more unique vantage points, but you’ll have to search a bit for those. The search is worth it, though, and I’ve found I never tire of visiting this location!
The 360 Bridge seemingly rises from the dense trees along the intersection of the Colorado River and the Capitol of Texas Highway. In the distance is Austin, Texas, on a perfect mid-September morning at sunrise.